For those have you that have developed that annoying problem where your fuel gauge always reads lower then what you know is in the tank, I have found a cheap and quick fix. You should budget about an hour to an hour and a half of your time to complete this fix with basic mechanical experience. Note that this fix was done on an ’04 STi but I would assume it would be similar for all models and years.
DISCLAIMER: I WILL NOT BE HELD RESPONSIBLE FOR ANY DAMAGES PERFORMED FOLLOWING THESE INSTRUCTIONS, PROCEED AT YOUR OWN RISK!!!
I am only an enthusiast and have no mechanic background to back these following steps up!!!I give credit where due and after doing a bunch of research and finding a bunch of “It’s just one of those Subaru quirks, learn to live with and love it,” I found one post in one legacy forum that had an ounce of hope to it.
Damn you Legacy guys are smart!
It can be seen here:
http://bbs.legacycentral.org/viewtopic.php?p=32270&sid=83b143ffb98ee5351bd98533323c210eEdit: Found another interesting link on the fuel gauge:
http://auto.howstuffworks.com/fuel-gauge.htmTools Required:• Phillips Screwdriver
• Angled Phillips Screwdriver
• 8mm Socket
• Pliers
• Rags and/or small bucket
• Fine grit (800) sand paper
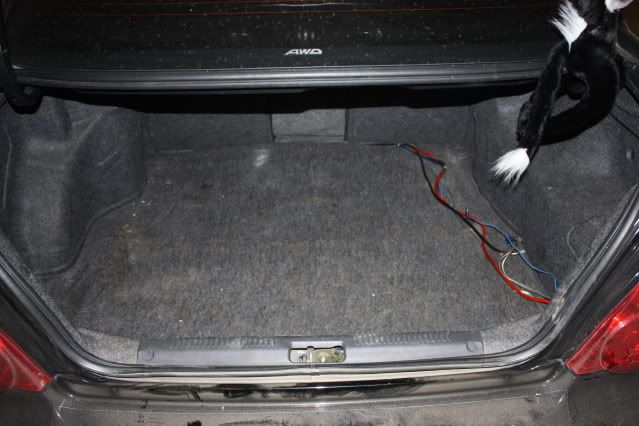
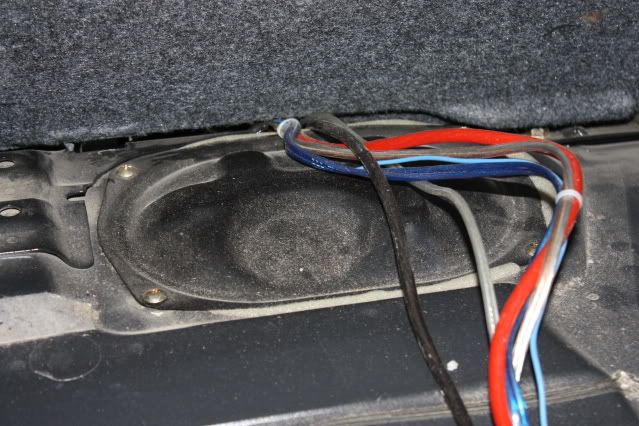
Before starting it is recommended that you disconnect the battery and remove any sources of ignition as you will be dealing with an open fuel tank.Step 1:Open the trunk and remove the carpet lining the floor. The carpet should be just set on there.
You guys with subs in the trunk will have to disconnect and remove those too.
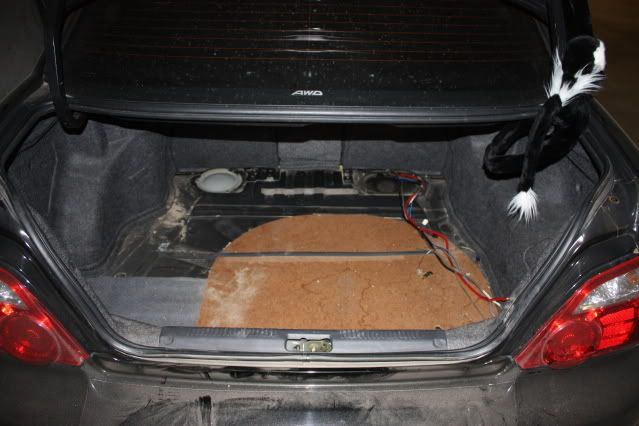 Step 2:
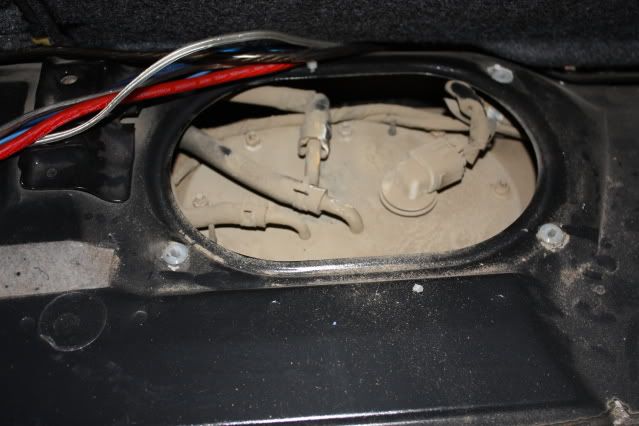
After removing the carpet you will see to small access covers near the front of the trunk. There will be a smaller circular one on the left side and a larger oval shaped one on the right side. The smaller one on the left side contains only a potentiometer attached to a float that measures the level in the upper half of the tank. The right side contains another potentiometer for measuring the lower half of the tank as well as it contains the fuel pump. I would suggest starting with the right hand side as it’s easier to remove and deal with and if you happen to mess something up it’s cheaper to replace.
Note that if your fuel tank only seems to read incorrect on the top half it may not only be the Left side that needs to be fixed as it seems to be a left (top) + right (bottom) side=full, rather then if left (top) side=full & right (bottom) side=empty then tank=full situation. Can you tell I haven't programmed since grade 9?

The smaller circular right hand side cover is held in place by 3 Phillips screws. Remove them. The screw closest to the seat is hard to get at, I’d suggest using an angled driver to remove (or at least start) this one.
After removing the metal cover there will be a thin foam gasket that prevents dust from entering the trunk. Remove it and place aside as it is not glued down and will just get in your way.
 Step 3:
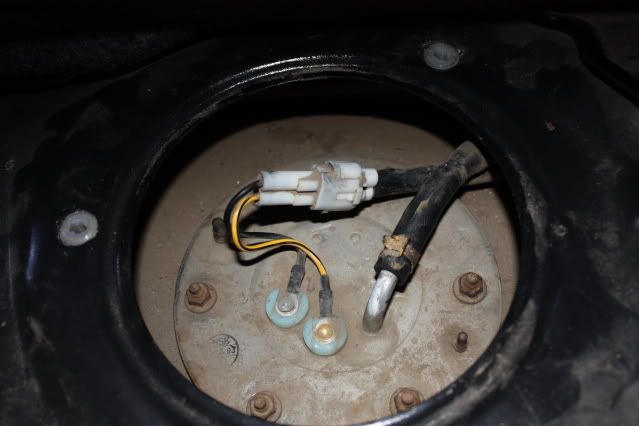
You will see an electrical plug and a rubber hose in the center of the cover. They will most likely be covered in dust so use a rag to wipe the dust off of them and the surrounding area. Disconnect the electrical connection and use pliers to slide the clamp off the metal elbow further down the hose. Remove the rubber hose from the connection by pulling it, a little wiggling action with the pliers on the hose will help if you’re not He-man, a little fuel may leak while removing this hose so have a rag ready just in case.
To get rid of the pressure in the system, you can unplug the fuel pump relay, located below glove box, beside passenger's right foot.

and then run engine until it dies. Then turn over for 5 more sec.
Courtessy of ClubWRX Link
Step 4:There will also be five 8mm hex nuts in a circular pattern holding a metal cover in place. This cover is attached to the potentiometer. Remove the five 8mm hex nuts and put them in a safe place. Use caution when removing them and DO NOT drop them! If you do you might have to remove the entire fuel tank to get them back.
 Step 5:
Once all the bolts are removed you will be able to pull the potentiometer and float from the tank. Once it is removed there will be a clear hole to the tank so don’t knock/drop any tools in there!
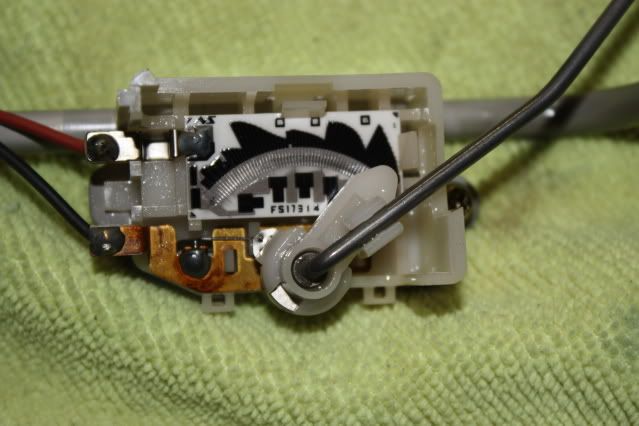
Take the potentiometer and float assembly over to a clean work area.
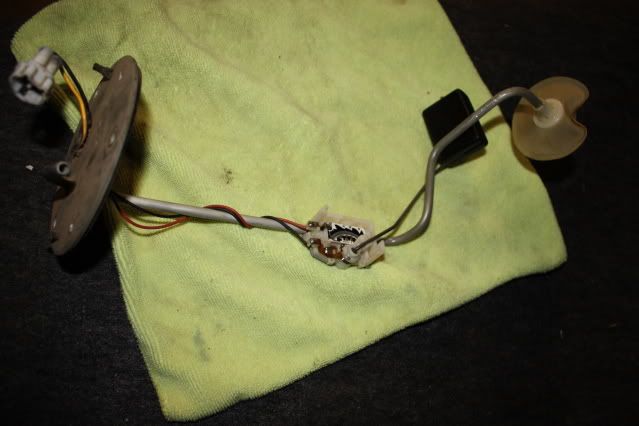
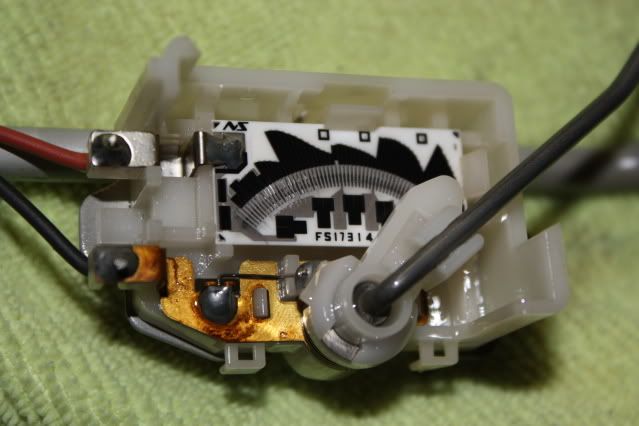
The potentiometer is the part we’re interested in is located in the middle of the assembly. You can see where the there is a moving contact that attaches to the float. The contact moving up and down wears a path of contamination on the potentiometer that does not allow the fuel level to be transmitted to the gauge. Mine seemed to be worse towards the top of the range of motion. The contamination looks like some one took a sharpie marker and drew an arc over the potentiometer.
Step 6:Take a rag (a Q-tip might work here too) and gently wipe down the area that looks contaminated. It is important not to wipe too hard as this is a delicate instrument and too much pressure can damage it (this is why we started with the one that is cheap to replace).
After wiping down the area with a rag, if there is still contamination visible, use the fine grain sand paper to gently (and I mean GENTLY!) remove any remaining contamination. It doesn’t take much force at all with the sandpaper to remove the remaining contamination... and it doesn’t take much more force then that to screw it up to the point where you have to order a new one (again this is why we started with the cheap one to replace).
I would try using a white eraser (not pink as it has acids) to clean the potentiometer contacts before going to the sandpaper.
Here’s a few pictures after the fact, I forgot to take some before shots. It’s better to aire on the side of caution and leave it a little dirty then to remove to much. The area we’re concerned about is on the series of lines in an arc formation. The contact is under the plastic piece that connects to the rod that goes out of the frame to the upper right hand side. Moving the float with your hand will trace over the area that we want to clean.
 Step 7:
After cleaning the potentiometer place it back in the tank. Be careful not to bend the rod that is attached to the float as this geometry is also critical in determining the fuel level. Screw down the five 8mm hex nuts and reattach the rubber hose and electrical connection.
Step 8:Put the thin foam gasket back over the hole and reattach the cover removed in step 2.
Step 9:You’re half done!! It’s not as hard as I made it seem, I swear. These steps should have taken about half an hour. If you put your key in the ignition and turn it to the on position you should see that the error in your fuel tank reading was cut roughly in half.
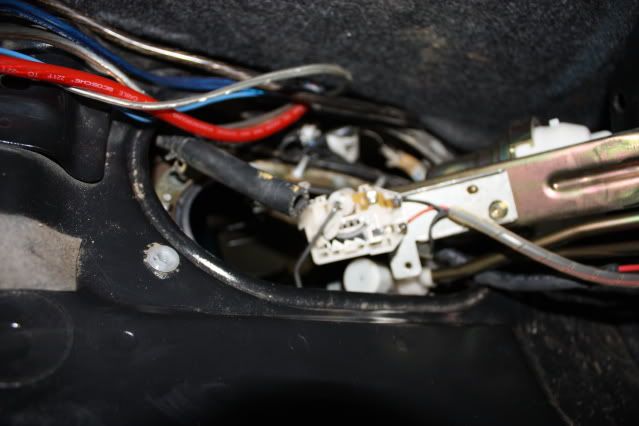
Step 10:Now it’s time for the right hand side (oval shaped cover) with the fuel pump. Remove the 4 Phillips head screws holding the cover in place. Again, the front 2 screws are kind of hard to get at and an angled screwdriver is suggested. All the wires coming out from under the seat are for my subs.. you may or may not have those present.
 Step 11:
After removing the cover you’ll be greeted with 3 rubber hoses and 1 electrical connection. Dust them off to make your life less messy.
Remove the electrical connection. Secondly, remove the 2 rubber hoses at the bottom of the picture (these use the clamps like the one we removed previously in step 3). Finally remove the final hose. This one uses a different kind of connection where you have to squeeze the 2 plastic tabs on the side after the hose ends while pulling on the hose. This hose was under a bit of pressure and there was quite a bit of fuel that came out of it before it stopped flowing. Have a small container and/or rag to catch the fuel that comes out. It’s probably a good idea to have these close by in case any of the hoses removed contains some extra fuel.
Step 12:There is eight 8mm nuts holding this oval shaped potentiometer,fuel assembly in place. Remove them and put them some place safe. On two of the bolts closest to the rear of the car there will be a plate that goes over 2 of the bolts. I’m not sure what this is for but pull it up off the bolts so that the cover can be removed. It is attached to something under the trunk so it can’t be removed completely so just pull it off the bolts and slide it back.
Step 13:After everything is removed and the cover is loose pull it up. It is a lot heavier then the left side and requires a lot more effort. It’s also bigger and a tighter squeeze through the opening (that’s what she said!) so it might take a bit of maneuvering to get it out. I was lazy by this point and just got it out enough so that the potentiometer was through the hole and exposed enough to perform the cleaning.
 Step 14:
Using the same procedure in step 6 clean the potentiometer. Again be careful not to damage it as this one will cost a lot more to replace since it’s part of the fuel pump assembly.
Step 15:Place the assembly back in the tank and secure using the eight 8mm nuts. Reattach the 3 rubber hoses and one electrical connection also.
Step 16:Put the thin foam gasket back over the opening followed by the oval cover. Tighten down with the 4 Phillips head screws.
Step 17:Put the carpet back down in the trunk clean up your mess and close the trunk. You’re done!
Now go fill up your tank and enjoy your fuel gauge reading full again!
My gauge started acting up around 100,000km and by the time a did this fix it was down to reading less then 5/8 of a tank after filling up and my low fuel light would come on at less then 200km on the tank. Now everything is back to normal.
Hope this helps!
-Trevor


